Hello, the names Elighja and I think its about time a tutorial on creating a title and game over screen has been created. Don't be expecting this tutorial to be full detail on drawing out your title and game over screen like I do. Its going to be a simple tutorial on enhancing a few photos to become you T&G screen. Ill also be giving advice and tips when adding fonts. First off ill be using Photoshop 7.0. I know its a little out dated but thats what I learned to use the best. I can do many, very powerful things with it. Okay, so lets get this started then.
Note: You will need to know the basics with photoshop
<==------Making A Title&GameOver Screen------==>
In this part of the tutorial we will be learning to make an easy title screen for your game. The pictures below were designed by me or I was given permission to use. Normally when you make a title screen you would want to use your own work due to copyright laws unless your given permission.
Ill be using
www.tinypic.com to upload my photos onto. Its a very nifty site that does not require registration.
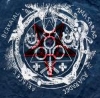
The image we will enhance for the title screen is the one directly below. Its resized for an RM2K3 title screen (320x240 pixels).
![[Photoshop] Title/Gameover Screen Design 2hqf12r](https://2img.net/h/oi27.tinypic.com/2hqf12r.jpg)
Okay copy that image to your photoshop. Make sure its 320x240 pixels. Okay now press ctrlA which will do a select all. Then press ctrlC which will copy and then press ctrlV which will paste. Paste it twice so that you will have three layers of the same image. Name the first layer, Layer 1, second layer...Layer 2, third layer....Layer 3. The Layer 1 would be the original and the other two the pasted ones. Now click on the third layer which will look something like this whats directly below...
[url="https://2img.net/h/oi25.tinypic.com/205p0s8.jpg"]
https://2img.net/h/oi25.tinypic.com/205p0s8.jpg[/url]Now that you have clicked on the third layer, go to the Layer menu>Layer Style>Blending Options. Now change the blend mode to overlay and press okay. You will then notice the image color change to more brighter lighter version. Don't panic because its about to change into something really amazing. So far this is what it would like changed thus far...
![[Photoshop] Title/Gameover Screen Design 2qdr7kg](https://2img.net/h/oi32.tinypic.com/2qdr7kg.jpg)
Okay, lets make this picture look amazing color wise. Click on the second layer, go the the Filter menu>Blur>Gaussian Blur. Now choose a number between 1.0 - 2.5 but I recommend 2.5 because thats what I always use. Now your T&G screen looks pretty dope. All thats left to do is add image borders if you want and text. This is what it would look like thus far...
![[Photoshop] Title/Gameover Screen Design Jfepkz](https://2img.net/h/oi28.tinypic.com/jfepkz.jpg)
If you want to add borders, add them to the third and second layer. Never the first because its the original. You dont touch the original or all go out of wack. Pluse the original is for backup if you screw up somewhere.
Now we add text. What you want to do is play around with the text to see which one fits your screens theme. Then you want to go to the Layer menu>Layer Style>Blending Options...and play with those settings till you text looks amazing. But one thing you want to do is almost always stroke you text with the blending options to make it stand out...so that the white text doesnt disappear with a white background...etc. The only time you dont stroke your text is when you duplicate the text layer. And doing the same thing to the text as you did with the image in this tutorial. The first example below is with a stroked text...maybe some shadow and the second image below is with the duplicated text. Remember, if you duplicate the text you can make it look like a mirror...
![[Photoshop] Title/Gameover Screen Design 2vc6mma](https://2img.net/h/oi32.tinypic.com/2vc6mma.jpg)
![[Photoshop] Title/Gameover Screen Design 34exob8](https://2img.net/h/oi31.tinypic.com/34exob8.jpg)
![[Photoshop] Title/Gameover Screen Design 2qn03kh](https://2img.net/h/oi30.tinypic.com/2qn03kh.jpg)
![[Photoshop] Title/Gameover Screen Design Eb4l09](https://2img.net/h/oi25.tinypic.com/eb4l09.jpg)
Now play around with the blending options and filters. Doing that you will find a great combination for your text that will match perfectly with your title screens. Sometimes I use a mixture of strokes and duplicates for my fonts. Or I blend them in with the picture so that it looks like its part of it. Well thats all for this tutorial...be sure to see a tutorial released on drawing your own title&game over screen sometime in the near future.
Remember, its always about the looks. You know the saying its not about whats on the outside but whats in the inside. Well in this situation that saying is totally the opposite. Thank you for your time!!! :glare:
<==------The End------==>
Credits:Elighja